|
一些Python包的坑
pybluez 网上搜连接蓝牙,都是用的这个包。其中BLE是基于bluez的,使用的是gattlib这个包,不支持windows系统。不记得当时是因为什么放弃用它了 bluepy 这个是第二个尝试的包,和设备连接时,每次只能收20字节的数据,设置了MTU也没用。而且它用了bluez自带的gatttool,这个工具已经废弃。最终也放弃了 gatt(gatt-python) 这个是通过DBUS消息来扫描和连接BLE设备的。这个包亲测可用,缺点是也只支持Linux系统。
gatt的安装
官方文档看这里。 简单来说,只要电脑上面带的有bluez,使用下面2条命令安装即可: sudo pip3 install gatt sudo apt-get install python3-dbus
我的电脑系统信息如下:
ubantu版本 Ubuntu 7.5.0-3ubuntu1~18.04)终端输入bluetoothctl查看bluez版本  终端输入hciconfig -a查看蓝牙版本 终端输入hciconfig -a查看蓝牙版本  准备BLE设备
我用了iOS上的Bluelight,设置service中的特性Lzchar支持read,write和notify。设置步骤看这篇文章。 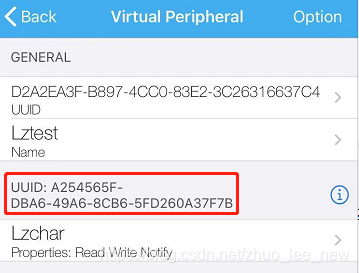
Python实现BLE扫描
官方扫描代码示例
使用以下代码就可以扫描到所有的BLE设备。
import gatt
class AnyDeviceManager(gatt.DeviceManager):
def device_discovered(self, device):
print("Discovered [%s] %s" % (device.mac_address, device.alias()))
manager = AnyDeviceManager(adapter_name='hci0')
manager.start_discovery()
manager.run()
带过滤的扫描
以上官方示例在实际使用时,会在BLE设备过多的环境下扫出一大堆的设备,其实我们只想要扫到自己关心的或者待测的设备,这时,可以通过添加filter来实现。只需要改动上面代码中的start_discovery()方法即可。
通过service uuid扫描(官方包中默认使用的方法)
service_uuids=['A254565F-DBA6-49A6-8CB6-5FD260A37F7B']
manager.start_discovery(service_uuids=service_uuids)

扩展filter,通过alias扫描 官方包提供的方法已经可以通过service uuid把不关心的设备都筛选掉。但是我遇到个情况,某个设备无法通过UUIDs筛选掉,这时可以考虑用其他的过滤器。bluez接口中支持的filter可以通过bluez/doc/adapter-api.txt中的void SetDiscoveryFilter(dict filter)方法来查看,我这里用Pattern。通过Pattern可以筛选出MAC地址或者device name以某个字符串开始的设备。bluez中官方说明如下: 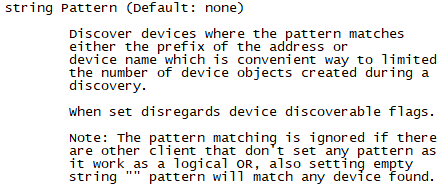 在BLE设备的SN(name)是以型号开始的场景下,使用Pattern可以筛选出感兴趣的某一型号的设备。代码更改如下: 1) 修改gatt包中的gatt_linux.py中start_discovery方法,增加支持通过name前缀来筛选设备。 在BLE设备的SN(name)是以型号开始的场景下,使用Pattern可以筛选出感兴趣的某一型号的设备。代码更改如下: 1) 修改gatt包中的gatt_linux.py中start_discovery方法,增加支持通过name前缀来筛选设备。 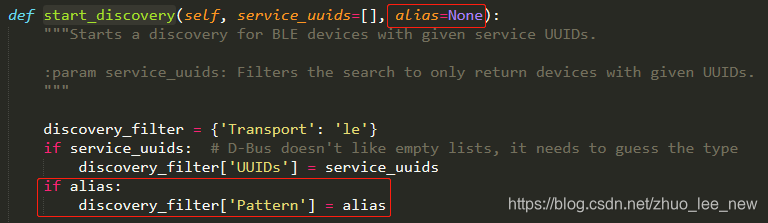 2)修改扫描BLE设备时过滤方式
manager = AnyDeviceManager(adapter_name='hci0')
manager.start_discovery(alias='Lzte')
manager.run() 2)修改扫描BLE设备时过滤方式
manager = AnyDeviceManager(adapter_name='hci0')
manager.start_discovery(alias='Lzte')
manager.run()

Python实现BLE连接和控制
简单实现BLE连接 官方包提供的连接BLE设备的代码可以看这里。运行后可以看到如下的输出:  BLE读写数据 1) 事先准备好的LightBlue中BLE设备中,characteristics如图: BLE读写数据 1) 事先准备好的LightBlue中BLE设备中,characteristics如图: 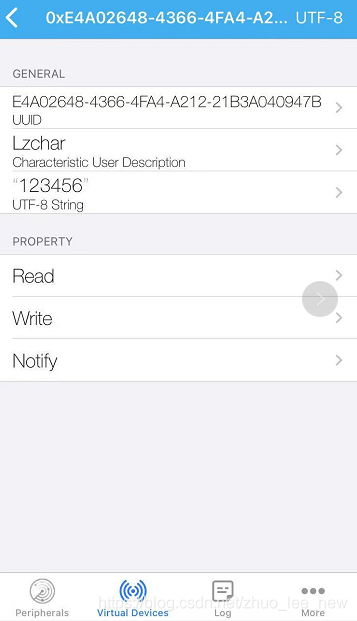 2)实现BLE中设备属性的read
def services_resolved(self):
super().services_resolved()
service = next(
s for s in self.services
if s.uuid == 'A254565F-DBA6-49A6-8CB6-5FD260A37F7B'.lower())
lzchar = next(
c for c in service.characteristics
if c.uuid == 'E4A02648-4366-4FA4-A212-21B3A040947B'.lower())
lzchar.read_value()
def characteristic_value_updated(self, characteristic, value):
print("Lzchar:", value.decode("utf-8")) 2)实现BLE中设备属性的read
def services_resolved(self):
super().services_resolved()
service = next(
s for s in self.services
if s.uuid == 'A254565F-DBA6-49A6-8CB6-5FD260A37F7B'.lower())
lzchar = next(
c for c in service.characteristics
if c.uuid == 'E4A02648-4366-4FA4-A212-21B3A040947B'.lower())
lzchar.read_value()
def characteristic_value_updated(self, characteristic, value):
print("Lzchar:", value.decode("utf-8"))
运行后输出如下:  3)实现BLE设备属性改动后的notify提醒 3)实现BLE设备属性改动后的notify提醒
def services_resolved(self):
super().services_resolved()
service = next(
s for s in self.services
if s.uuid == 'A254565F-DBA6-49A6-8CB6-5FD260A37F7B'.lower())
lzchar = next(
c for c in service.characteristics
if c.uuid == 'E4A02648-4366-4FA4-A212-21B3A040947B'.lower())
lzchar.enable_notifications()
def characteristic_enable_notifications_succeeded(self, characteristic):
super().characteristic_enable_notifications_succeeded(characteristic)
print("[%s] notify ok" % (self.mac_address))
def characteristic_enable_notifications_failed(self, characteristic, error):
super().characteristic_enable_notifications_failed(characteristic, error)
print("[%s] notify err. %s" % (self.mac_address, error))
def characteristic_value_updated(self, characteristic, value):
print("Lzchar:", value.decode("utf-8"))
运行后,如果notify开启成功,会提示notify ok 开启成功后,在LightBlue中的BLE设备上修改Lzchar的值,改动后,程序会自动获取到notify的消息。 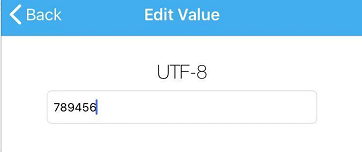
输出如下:  4) 实现BLE设备的write 4) 实现BLE设备的write
def services_resolved(self):
super().services_resolved()
service = next(
s for s in self.services
if s.uuid == 'A254565F-DBA6-49A6-8CB6-5FD260A37F7B'.lower())
lzchar = next(
c for c in service.characteristics
if c.uuid == 'E4A02648-4366-4FA4-A212-21B3A040947B'.lower())
lzchar.write_value('test_write'.encode())
def characteristic_write_value_succeeded(self, characteristic):
super().characteristic_write_value_succeeded(characteristic)
print("[%s] wr ok" % (self.mac_address))
def characteristic_write_value_failed(self, characteristic, error):
super().characteristic_write_value_failed(characteristic, error)
print("[%s] wr err %s" % (self.mac_address, error))
运行后输出如下:  查看Bluelight中BLE设备该特性的值已经变成了test_write 查看Bluelight中BLE设备该特性的值已经变成了test_write 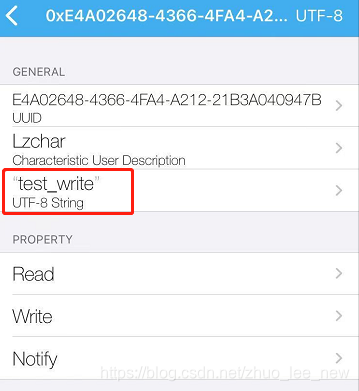
实际应用
流程分析
在实际使用中,BLE设备充当的是server的角色,bluez作为client根据定义的协议文档去去对BLE设备做连接和控制测试。 举个例子,BLE设备提供了2个characteristic,其中一个char1支持写入指令(eg,查询版本号的指令0xab),设备拿到指令后处理指令,并通过另一个char2(支持notify)把信息同步给监听设备。那作为客户端需要先监听char2,之后通过char1写入查询版本号指令0xab,然后会接收到notify消息,拿到设备的版本号。对照上面的代码示例,步骤如下:
connectnotifychar2起个线程做run()让client一直处于监听状态主线程处于输入指令的状态
代码示例
设备还是以Lightblue中的设备为例,更新了lzchar的属性为write,新增characteristic lzchar2,支持属性notify。 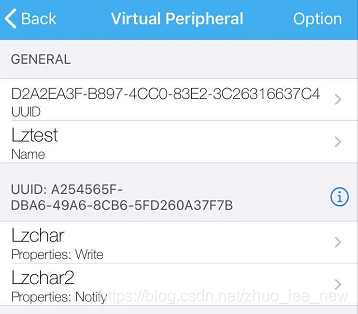 代码如下: 代码如下:
import gatt
import threading
import time
class AnyDeviceManager(gatt.DeviceManager):
def device_discovered(self, device):
print("Discovered [%s] %s" % (device.mac_address, device.alias()))
def loop_start(self):
self._thread = threading.Thread(target=self.run)
self._thread.daemon = True
self._thread.start()
def loop_stop(self):
self.stop()
class AnyDevice(gatt.Device):
def __init__(self, mac_address, manager):
self.lzchar = None
super().__init__(mac_address, manager, managed=True)
def connect_succeeded(self):
super().connect_succeeded()
print("[%s] Connected" % (self.mac_address))
def connect_failed(self, error):
super().connect_failed(error)
print("[%s] Connection failed: %s" % (self.mac_address, str(error)))
def disconnect_succeeded(self):
super().disconnect_succeeded()
print("[%s] Disconnected" % (self.mac_address))
def services_resolved(self):
super().services_resolved()
service = next(
s for s in self.services
if s.uuid == 'A254565F-DBA6-49A6-8CB6-5FD260A37F7B'.lower())
self.lzchar = next(
c for c in service.characteristics
if c.uuid == 'E4A02648-4366-4FA4-A212-21B3A040947B'.lower())
lzchar2 = next(
c for c in service.characteristics
if c.uuid == '2AA6068E-9981-4B3B-BC8F-E6F1A6D5EAE8'.lower())
lzchar2.enable_notifications()
def characteristic_enable_notifications_succeeded(self, characteristic):
super().characteristic_enable_notifications_succeeded(characteristic)
print("[%s] notify ok" % (self.mac_address))
def characteristic_enable_notifications_failed(self, characteristic, error):
super().characteristic_enable_notifications_failed(characteristic, error)
print("[%s] notify err. %s" % (self.mac_address, error))
def characteristic_write_value_succeeded(self, characteristic):
super().characteristic_write_value_succeeded(characteristic)
print("[%s] wr ok" % (self.mac_address))
def characteristic_write_value_failed(self, characteristic, error):
super().characteristic_write_value_failed(characteristic, error)
print("[%s] wr err %s" % (self.mac_address, error))
def characteristic_value_updated(self, characteristic, value):
print("[%s] noty: %s" % (self.mac_address, value))
manager = AnyDeviceManager(adapter_name='hci0')
device = AnyDevice(mac_address='BLE MAC地址', manager=manager)
device.connect()
time.sleep(1)
manager.loop_start()
while True:
cmd = input("input a command...(press Enter to stop ble connect.)\n")
if len(cmd) |